When it comes to maintaining your vacuum cleaner, one task that may come up is removing the wheels. Whether you need to replace a damaged wheel or clean hard-to-reach areas, knowing how to remove the vacuum cleaner wheel properly is essential. In this guide, I will walk you through the step-by-step process to ensure a hassle-free experience.
Key Takeaways:
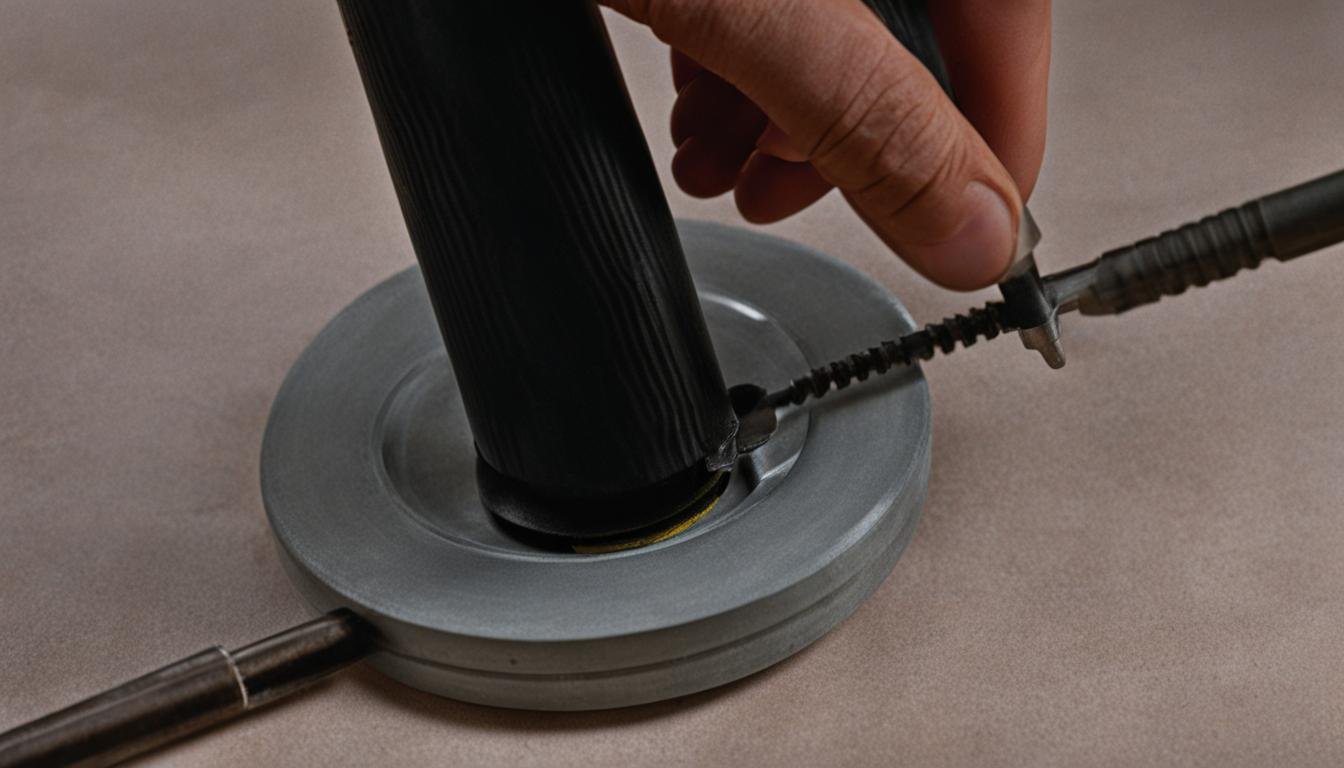
- To remove a vacuum cleaner wheel, you will need tools like pliers, a punch, and a hammer.
- Start by removing the wheel retainer cap using pliers to pry it off the axle.
- Remove the wheel from the axle while retaining the washer, if removing the rear wheel.
- When installing the new wheel, place it onto the axle and secure it with the wheel retainer cap.
- Use a punch and hammer to ensure the cap is properly secured.
Tips for Removing Vacuum Cleaner Wheels
When it comes to removing vacuum cleaner wheels, there are a few tips and tricks that can make the process easier and more efficient. Whether you’re attempting a DIY vacuum cleaner wheel removal or simply want to know the best practices, here are some valuable insights to keep in mind:
- Replace the Wheel Retainer Caps: It’s important to note that the wheel retainer caps are prone to bending or warping during the removal process. To ensure smooth and hassle-free removal, always order new caps along with your replacement wheels. This way, you can replace the caps alongside the wheels, allowing for a seamless installation.
- Loosen Stiff or Stuck Wheels: If you encounter wheels that are stiff or stuck in their position, don’t fret. You can try using a penetrating oil or lubricant to loosen them up. Applying a small amount of lubricant to the wheel’s axle can help reduce friction and make it easier to remove. Remember to give the lubricant some time to work its magic before attempting to remove the wheels.
- Apply Force or Leverage: Sometimes, a little extra force or leverage can go a long way in removing stubborn vacuum cleaner wheels. You can use a pair of pliers or a screwdriver to apply controlled force and create some leverage. However, exercise caution to avoid damaging the wheels or other components in the process.
If you’re uncertain about the removal process or worried about causing any damage, it’s always a good idea to consult a professional or refer to the vacuum cleaner’s user manual. These resources can provide specific instructions tailored to your particular make and model, ensuring a safe and successful wheel removal.
| Pros | Cons |
|---|---|
| Easy and cost-effective | Potential risk of damaging wheels or other components |
| No special tools required | May require some physical effort |
| Ability to replace old or worn-out wheels | May void warranty if not done correctly |
By following these tips, you can confidently remove vacuum cleaner wheels without any hassle. Whether you’re a seasoned DIY enthusiast or a beginner, these insights will help you navigate the process with ease and efficiency.
Vacuum Cleaner Wheel Replacement Guide
When it comes to replacing the wheels on your vacuum cleaner, it’s crucial to ensure that you have the right replacement parts for your specific model. To guarantee compatibility, I recommend referring to your vacuum cleaner’s user manual or consulting the manufacturer’s website for detailed information.
To start the replacement process, you’ll need to remove the old wheels using the steps outlined in section one of this guide. Once the old wheels are off, follow the same steps in reverse order to install the new wheels. Take care to properly secure the wheel retainer caps to prevent any movement or wobbling.
After installing the new wheels, it’s essential to test the vacuum cleaner to ensure that the wheels are functioning correctly and rolling smoothly. If you encounter any issues or have concerns about the replacement process, I recommend troubleshooting the problem or seeking professional assistance to address any troubleshooting or concerns.
FAQ
How do I remove a vacuum cleaner wheel?
To remove a vacuum cleaner wheel, start by removing the wheel retainer cap with pliers. Then, remove the wheel from the axle and retain the washer if it’s a rear wheel. When installing a new wheel, place it onto the axle and secure it with the retainer cap. Use a punch and hammer to ensure the cap is properly secured.
What tools do I need to remove a vacuum cleaner wheel?
To remove a vacuum cleaner wheel, you will need pliers, a punch, and a hammer.
Can I use a lubricant to remove stuck vacuum cleaner wheels?
Yes, you can try using a penetrating oil or lubricant to loosen stiff or stuck vacuum cleaner wheels. Applying force or leverage may also help.
How do I replace vacuum cleaner wheels?
To replace vacuum cleaner wheels, start by removing the old wheels following the steps outlined above. Then, install the new wheels by placing them onto the axle and securing them with the retainer cap. Make sure to properly secure the cap to prevent movement or wobbling.
What if I am unsure about removing or replacing vacuum cleaner wheels?
If you are unsure about the process or concerned about damaging the wheels, it is recommended to consult a professional or refer to the vacuum cleaner’s user manual for specific instructions.


Leave a Reply