Welcome to my step-by-step guide on how to open a vacuum cleaner motor. This comprehensive guide will provide you with all the information you need to safely access and disassemble your vacuum cleaner motor. By following these instructions, you’ll be able to troubleshoot, repair, or perform maintenance on your vacuum cleaner with ease.
Opening a vacuum cleaner motor can be a daunting task, but with the right guidance and tools, it becomes a straightforward process. Whether you’re facing issues like loss of suction or a non-functioning motor, accessing the motor can help you identify and resolve the problem.
Throughout this guide, I will share the most useful and relevant information from various sources to ensure you have a comprehensive understanding of how to open a vacuum cleaner motor. So, let’s get started!
Key Takeaways:
- Opening a vacuum cleaner motor is essential for troubleshooting, repairing, or performing maintenance on your vacuum cleaner.
- Accessing the motor allows you to check for clogs, replace damaged parts, or perform necessary repairs.
- It is important to follow step-by-step instructions and use the right tools to safely open the vacuum cleaner motor.
- Always refer to the user manual for additional guidance and safety precautions.
- With proper care and maintenance, your vacuum cleaner can continue to perform optimally for years to come.
Reasons to Open a Vacuum Cleaner Motor
There are several important reasons why accessing and opening your vacuum cleaner motor may be necessary. One common scenario is when you face issues such as loss of suction or a motor that won’t run at all. By gaining access to the motor, you can effectively troubleshoot and diagnose the problem. This enables you to undertake appropriate repairs and ensure that your vacuum cleaner continues to perform optimally.
When you open the motor, you can thoroughly check for any clogs that could be obstructing airflow or causing suction problems. Clearing these blockages can significantly improve the performance of your vacuum cleaner. Additionally, you may need to replace damaged parts within the motor, such as the brushes or fan, which can affect the overall functionality of the appliance.
Moreover, opening the motor provides an opportunity for routine maintenance. Over time, debris and dust can accumulate, affecting the motor’s efficiency and performance. By cleaning the fan, removing debris, and replacing worn-out brushes, you can extend the lifespan of your vacuum cleaner motor and maintain its optimal functionality.
It’s crucial to understand the steps involved in accessing and opening the vacuum cleaner motor to ensure safe and effective troubleshooting or repair. Following a step-by-step guide will help you navigate the process smoothly, ensuring that you can address any issues and keep your vacuum cleaner in excellent working condition.
Step-by-Step Guide: How to Open a Vacuum Cleaner Motor
Is your vacuum cleaner motor giving you trouble? Opening the motor can provide you with valuable access to diagnose and address any issues. Follow these step-by-step instructions to safely open your vacuum cleaner motor and get it back in working order.
- Unplug the vacuum cleaner: Before starting any work on the motor, always unplug the vacuum cleaner from the power source to ensure your safety.
- Gather the necessary tools: To open the vacuum cleaner motor, you’ll need a set of screwdrivers, including Phillips and flathead, as well as any other tools specified in your vacuum cleaner’s user manual.
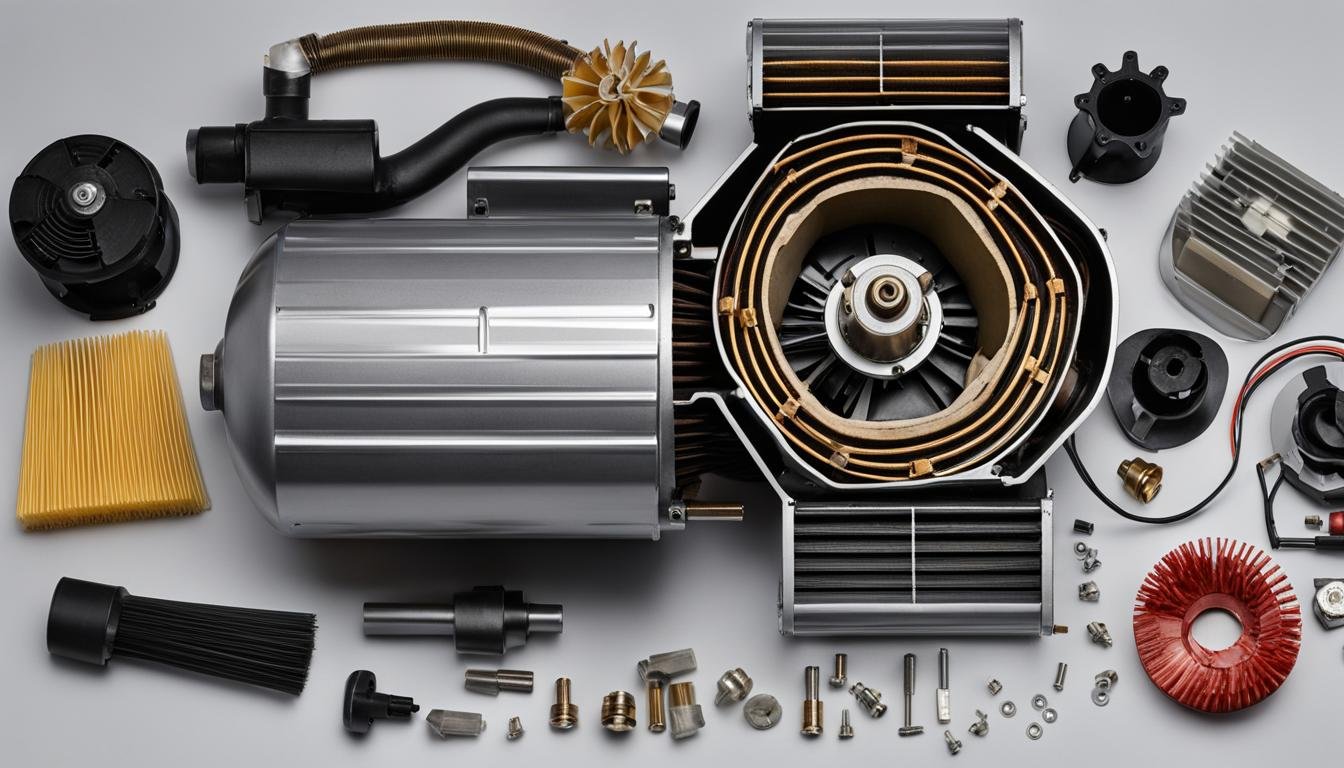
- Access the motor housing: Locate the screws or clips that hold the motor housing in place. Use the appropriate screwdriver or release the clips to remove the housing and expose the motor.
- Inspect the motor connections: Once the motor is accessible, carefully examine the wiring connections. Take note of their positions or consider taking a picture for reference when reassembling later.
- Disconnect the motor: Depending on your vacuum cleaner model, you may need to disconnect the motor from the wiring harness or remove any screws securing it in place. Refer to your user manual or manufacturer’s instructions for guidance.
- Remove the motor: Lift out the motor from its housing. Be mindful of any additional components or obstacles that may need to be disassembled or removed to properly extract the motor.
- Proceed with caution: Once the motor is removed, handle it with care. Avoid damaging any fragile components or wires during the disassembly process.
- Inspect and troubleshoot: With the motor disassembled, thoroughly inspect it for any signs of damage, dirt, or blockages that may be affecting its performance. Clean or replace any worn-out parts as necessary.
That’s it! By following these steps, you can safely open your vacuum cleaner motor and gain access for troubleshooting, cleaning, or repairs. Remember to consult your user manual for specific instructions related to your vacuum cleaner model. Now you’re ready to get your vacuum cleaner back to optimum performance.
Opening a vacuum cleaner motor can be a straightforward process when done correctly. It provides you with the access you need to diagnose and resolve any issues, ensuring your vacuum cleaner performs at its best.

Conclusion
Opening a vacuum cleaner motor is a straightforward process that can be done with the right tools and instructions. By following our step-by-step guide, you can safely access and disassemble the motor for troubleshooting, repair, or maintenance purposes.
Before starting any work, it is crucial to always unplug the vacuum cleaner to ensure your safety. Additionally, referring to the user manual for additional guidance is highly recommended to avoid any potential issues.
With proper care and maintenance, your vacuum cleaner can continue to perform optimally for years to come. Regularly cleaning the motor, checking for clogs, and replacing worn-out parts will ensure the longevity of your vacuum cleaner’s performance. Investing a little time in understanding and accessing the motor will save you from the hassle of expensive repairs or the need for a new vacuum cleaner.
With our comprehensive guide, you can confidently open your vacuum cleaner motor and address any issues that may arise. Troubleshoot, repair, and maintain your vacuum cleaner effectively, and enjoy clean and fresh surroundings with a fully functional appliance.
FAQ
Why would I need to open my vacuum cleaner motor?
There are several reasons why you might need to open your vacuum cleaner motor. One common reason is to troubleshoot issues with the motor, such as loss of suction or the motor not running at all. By accessing the motor, you can check for clogs, replace damaged parts, or perform any necessary repairs. Opening the motor also allows for routine maintenance, such as cleaning the fan or replacing brushes.
How can I access the vacuum cleaner motor?
To access the vacuum cleaner motor, first, make sure the vacuum cleaner is unplugged. Then, locate the screws or clips that hold the motor housing in place. Use a screwdriver or a suitable tool to remove these screws or release the clips. Once the housing is removed, you should have clear access to the motor.
Is it difficult to disassemble the vacuum cleaner motor?
Disassembling the vacuum cleaner motor can vary depending on the model and brand. However, with the right tools and instructions, it can be a straightforward process. Generally, you’ll need to remove the motor cover, disconnect any wires or connectors attached to the motor, and unscrew the motor from its mounting brackets. Take note of the order and position of any parts you remove to ensure proper reassembly.
How can I troubleshoot and repair my vacuum cleaner motor?
Once you have safely accessed and disassembled the vacuum cleaner motor, you can begin troubleshooting and repairing any issues. Check for clogs or obstructions in the motor housing or fan. Examine the motor for damaged or worn-out parts, such as brushes or capacitors, and replace them as necessary. If you’re unsure about specific repairs, it’s best to consult the vacuum cleaner’s user manual or contact the manufacturer for guidance.
How often should I perform maintenance on my vacuum cleaner motor?
Regular maintenance of your vacuum cleaner motor is essential for optimal performance and longevity. It’s recommended to clean the motor housing and fan at least once every few months to prevent build-up of dirt and debris. Additionally, check the motor brushes regularly and replace them when they become worn down. Refer to the user manual for specific maintenance instructions and intervals for your vacuum cleaner model.


Leave a Reply