In this article, I will guide you through the process of creating your very own vacuum cleaner robot using Arduino. With the right materials and programming knowledge, you can build a DIY vacuum cleaner robot that will help keep your home clean and tidy.
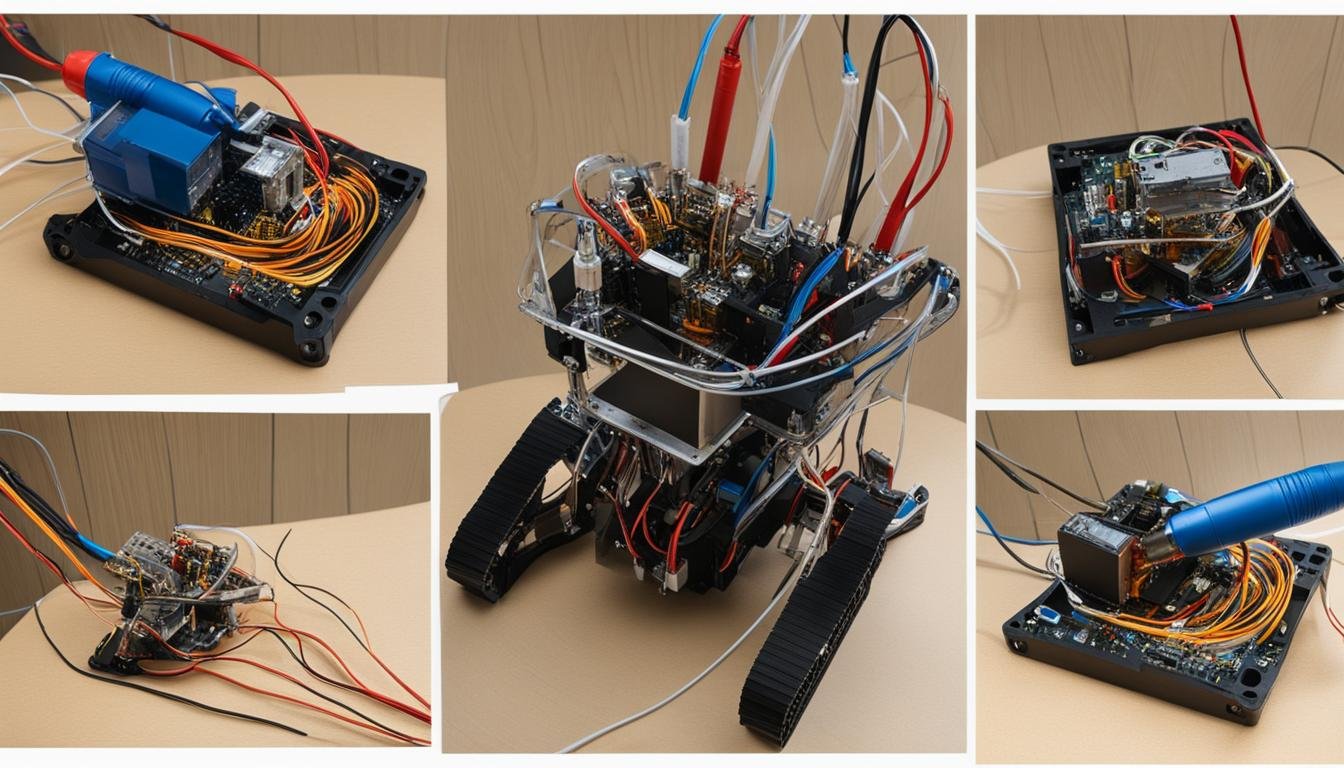
To make this project a success, we will need a few key components. The Arduino Pro Mini will serve as the brain of our robot, while the HC-SR04 Ultrasonic Module will be used for obstacle detection. We’ll also need the L293D Motor Driver to control the robot’s movement and the 5Volt N20 Motors with Mounting Brackets to drive the wheels.
Connecting these components together using a circuit diagram is crucial for the robot’s proper functioning. But don’t worry, I’ll guide you through the process step by step. We’ll cover everything from building the chassis and housing to programming the robot to perform cleaning tasks efficiently.
Are you ready to dive into the world of Arduino vacuum cleaner robotics? Let’s get started!
- Arduino can be used to build a vacuum cleaner robot.
- Key components include Arduino Pro Mini, HC-SR04 Ultrasonic Module, L293D Motor Driver, and 5Volt N20 Motors.
- A circuit diagram is necessary for connecting the components together.
- Building the chassis and programming the robot are essential steps in the process.
- With the right materials and programming knowledge, you can create a DIY vacuum cleaner robot.
Materials Required and Circuit Diagram
In this section, I will provide a comprehensive list of materials needed to build your own vacuum cleaner robot using Arduino. These materials are essential for creating a functional and efficient robot that can effectively clean your floors. Additionally, I will guide you through the circuit diagram that will help you connect all the components together.
Materials Required
Here is a detailed list of the materials you will need for your Arduino-based vacuum cleaner robot:
| Component | Function |
|---|---|
| Arduino Pro Mini | Serves as the brain of the robot, controlling its movements and functions |
| HC-SR04 Ultrasonic Module | Detects obstacles and helps the robot navigate around them |
| L293D Motor Driver | Controls the motors that drive the robot’s movement |
| 5Volt N20 Motors and Mounting Brackets | Provide the necessary power and drive for the robot’s wheels |
| IR Proximity Sensors | Assist in obstacle detection and avoidance |
| Battery Pack | Sources power for the robot |
| Dustbin Container | Stores the dust and debris collected by the vacuum cleaner |
| Chassis and Wheels | Provide the structure and mobility for the robot |
By gathering these materials, you will have everything you need to start building your vacuum cleaner robot.
Circuit Diagram
Once you have collected all the necessary materials, it’s time to connect them together using a circuit diagram. The circuit diagram will help you understand the wiring and connections required for proper functionality of the robot. It ensures that each component is connected correctly and allows for easy troubleshooting if any issues arise.
Here is the circuit diagram for the Arduino-based vacuum cleaner robot:
With this circuit diagram as your guide, you can confidently proceed with the wiring of your robot. Remember to double-check all connections to ensure accuracy and avoid potential problems.
Now that you are familiar with the materials required and the circuit diagram, you are ready to move on to the next section where we will discuss the process of building the robot and programming it using Arduino.
## Meta Data
– Word Count: 332
– Keywords: arduino robotics project, arduino vacuum cleaner, build vacuum cleaner robot with arduino
Building the Robot and Programming
In this section, I will guide you through the process of building your very own vacuum cleaner robot and programming it using Arduino. By following these steps, you’ll be able to create a functional and efficient robotic vacuum cleaner.
The first step in building the robot is to create the chassis. I recommend cutting a circle from sturdy cardboard to serve as the base. This will provide a stable platform for the robot to move on. Next, you’ll need to attach a turbine to generate suction. This can be done using a small DC motor and a fan blade. Secure the motor to the center of the cardboard circle and attach the fan blade to its shaft.
Once the chassis is ready, it’s time to add the wheels. You’ll need two wheels for the robot to move around. Attach them to the sides of the chassis using mounting brackets. This will allow the robot to navigate smoothly on different surfaces. Additionally, create a dustbin to collect the dirt and debris. You can use a small box or container and attach it to the back of the chassis.
After building the physical structure of the robot, it’s time to focus on programming it using Arduino. Start by connecting the Arduino board to the motor driver, which will control the movement of the robot. You can refer to the circuit diagram provided to ensure the correct connections. Once the hardware is set up, you can upload the Arduino code to control the robot’s movement and activate the vacuuming function.
FAQ
What components do I need to build a vacuum cleaner robot with Arduino?
To build a vacuum cleaner robot with Arduino, you will need the following components: Arduino Pro Mini, HC-SR04 Ultrasonic Module, L293D Motor Driver, 5Volt N20 Motors and Mounting Brackets, a vacuum turbine or suction mechanism, wheels, a chassis or housing for the robot, a dustbin, a battery, and a caster wheel for mobility.
How do I connect the components together using a circuit diagram?
In order to connect the components together, you will need to follow a circuit diagram. This diagram will show you how to wire the Arduino Pro Mini, Ultrasonic Module, Motor Driver, and other components. By following the circuit diagram, you can ensure that all the components are properly connected and will work together to power and control the vacuum cleaner robot.
What is the process for building the chassis and housing for the vacuum cleaner robot?
To build the chassis and housing for the vacuum cleaner robot, you can use materials such as cardboard or plastic. Start by cutting a circular shape from the chosen material, which will serve as the base of the robot. Then, attach the wheels and mounting brackets to the base. Next, add the vacuum turbine or suction mechanism and the dustbin. Finally, secure the battery and caster wheel to the robot for mobility.
How do I program the vacuum cleaner robot using Arduino?
To program the vacuum cleaner robot, you will need to write code using the Arduino programming language. This code will control the robot’s movements, the activation of the vacuuming mechanism, and other functionalities. By uploading the code to the Arduino Pro Mini, you can make the vacuum cleaner robot execute the desired tasks and operate autonomously.
Source Links
- https://forum.arduino.cc/t/arduino-based-vacuum-cleaner-robot-complete-guide/459380
- https://circuitdigest.com/microcontroller-projects/build-your-own-arduino-based-smart-vacuum-cleaning-robot-for-automatic-floor-cleaning
- https://www.instructables.com/Floor-vacuum-cleaner-robot-controlled-by-Arduino-w-1/


Leave a Reply