Hi there! If you’re facing issues with your vacuum cleaner wheel, don’t worry—I’ve got you covered! In this guide, I’ll walk you through simple steps to fix and maintain your vacuum cleaner wheel, helping you to restore its functionality and extend its lifespan. Let’s get started!
When it comes to fixing a vacuum cleaner wheel, proper maintenance is key. By following these easy DIY repair tips, you can save time and money by avoiding unnecessary professional assistance.
To begin, gather the necessary tools for the job. You’ll need a PH1 screwdriver, PH3 screwdriver, brush, metal pointer, and a black marker. Once you have all the tools ready, follow these steps:
- Start by disassembling the rotary brush and cleaning all the components with a damp cloth. Make sure the battery is disconnected for safety.
- Using the appropriate screwdrivers, remove the screws, being careful to only partially remove the screws for the front of the vacuum cleaner.
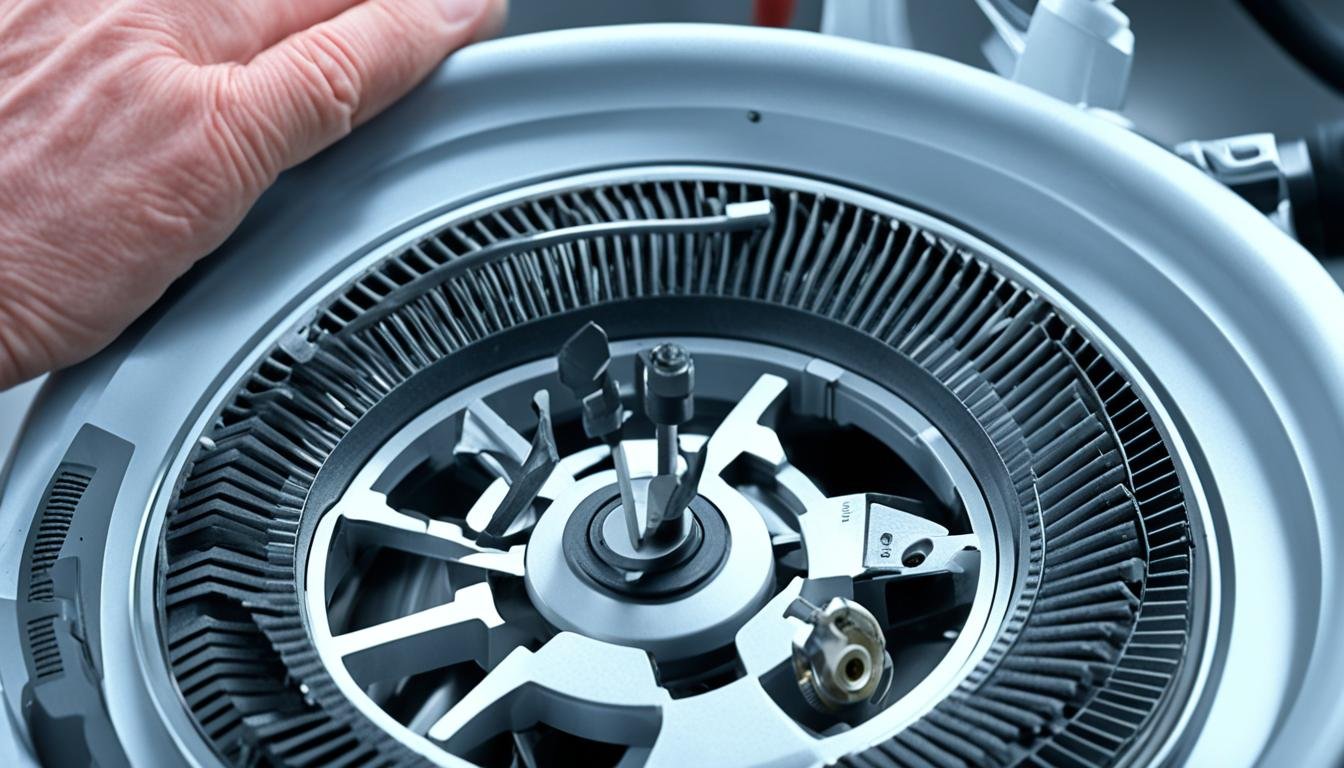
- Next, remove the top cover cautiously, as there is a cable connected to the LIDAR. Clean the dust from the motherboard and take a photo to remember the wire placement.
- Gently remove the metal flange of the wheel using a metal pointer, taking care not to damage the connector.
- Replace the wheel, reusing the PET bushings from the old wheel.
- Take the opportunity to clean any rust stains on the connectors, ensuring optimal performance.
- Finally, reassemble all the components, ensuring everything is properly aligned, and enjoy your vacuum cleaner with a fixed wheel!
Key Takeaways:
- Fixing a vacuum cleaner wheel yourself can save time and money.
- Before starting repairs, gather the necessary tools, including screwdrivers, a brush, a metal pointer, and a black marker.
- Remember to disconnect the vacuum cleaner from the power source and remove the battery for safety.
- Clean all components and take photos before disassembling to aid reassembly.
- When replacing the wheel, reuse the PET bushings from the old wheel and clean any rust stains on connectors.
How to Replace Vacuum Cleaner Wheels: Step-by-Step Guide
If you need to replace vacuum cleaner wheels, it’s essential to follow a simple step-by-step process. This guide will provide you with the necessary instructions to ensure a smooth and successful wheel replacement. Remember, regular maintenance is crucial to prevent common problems with vacuum cleaner wheels such as wear and tear or complete breakage.
Step 1: Safety First
Before starting any maintenance or repair tasks, switch off the vacuum cleaner and disconnect it from the mains for safety.
Step 2: Remove the Wheel Cap
Use a flathead screwdriver or a blunt butter knife to carefully remove the wheel cap. This will expose the hub and screws underneath.
Step 3: Unscrew and Remove the Hub
Using the appropriate tool, unscrew the hub and remove it from the wheel. Keep the screws and hub in a safe place to avoid misplacement.
Step 4: Place the New Wheel
Take the new vacuum cleaner wheel and position it in place of the old wheel. Make sure the wheel is securely attached to the appliance.
Step 5: Secure with Screws and Reattach the Hub
Use the original screws to secure the new wheel in place. Once the wheel is secured, reattach the hub by screwing it back into position.
Step 6: Repeat for the Other Wheel
If your vacuum cleaner has multiple wheels, repeat steps 2 to 5 for the remaining wheels.
Remember, each vacuum cleaner model may have slight variations in the procedure. Consult your user manual for specific instructions or contact the manufacturer for assistance if needed.
Regularly maintaining your vacuum cleaner wheels will help ensure their longevity and optimal performance. Keep an eye out for any signs of wear or damage and address them promptly to prevent further issues.
| Common Problems with Vacuum Cleaner Wheels | Solutions |
|---|---|
| Excessive wear and tear around the axle | Regularly clean and lubricate the axle to reduce friction. Replace worn-out wheels as needed. |
| Complete breakage of wheels | Follow the step-by-step guide above to replace the broken wheels with new ones. |
| Uneven rolling or wobbling motion | Check the screws and connections to ensure they are tightened properly. Adjust or replace wheels if necessary. |
By following these simple steps and practicing regular maintenance, you can easily replace vacuum cleaner wheels and ensure the smooth operation of your appliance.
Troubleshooting Vacuum Cleaner Wheel Issues
If you are experiencing issues with your vacuum cleaner wheel, here are some troubleshooting tips:
- If the wheel is not spinning, check for any debris or obstructions that may be causing blockage. Clean the wheel thoroughly and ensure it is properly aligned.
- If the wheel is stuck, try applying lubricant or gently tapping it to dislodge any debris that may be causing the obstruction.
- If the wheel keeps falling off, check for any loose or missing parts and tighten them accordingly.
If these troubleshooting steps do not resolve the issue, it may be necessary to seek professional repair or replacement for your vacuum cleaner wheel.
“A vacuum cleaner wheel not spinning can be frustrating, but often it’s a simple fix. By checking for blockages, cleaning the wheel, and ensuring proper alignment, you can usually get your vacuum cleaner back in working order.” – Sarah Johnson, Home Appliance Expert
Remember, regular maintenance and care for your vacuum cleaner wheels can help prevent these issues in the future. Stay proactive to keep your vacuum cleaner running smoothly and efficiently.

Quick Tip: Preventive Maintenance
To avoid vacuum cleaner wheel problems, schedule regular preventive maintenance. Clean the wheels and axles of your vacuum cleaner, remove any accumulated debris, and lubricate the moving parts as instructed in the user manual. This will help ensure optimal performance and extend the lifespan of your vacuum cleaner wheels.
Conclusion
Fixing a vacuum cleaner wheel is a simple and cost-effective solution to common issues that may arise. By following the maintenance and repair tips outlined in this article, you can easily tackle problems such as wheel replacement, troubleshooting, and regular upkeep.
Remember to prioritize safety by disconnecting the vacuum cleaner from power sources before starting any repair or maintenance tasks. This will help prevent accidents and maintain a safe working environment.
Properly maintaining your vacuum cleaner’s wheels ensures optimal performance and a longer lifespan for your appliance. Regularly inspecting and cleaning the wheels, as well as addressing any problems early on, can prevent more extensive damage and costly repairs in the future.
By dedicating a little time and effort to caring for your vacuum cleaner’s wheels, you can keep your appliance running smoothly and efficiently, making your cleaning tasks easier and more enjoyable.
FAQ
How do I fix a vacuum cleaner wheel?
To fix a vacuum cleaner wheel, follow these simple steps. Start by gathering the necessary tools, including a PH1 screwdriver, PH3 screwdriver, brush, metal pointer, and black marker. Disassemble the rotary brush and clean everything with a damp cloth, ensuring that the battery is disconnected. Remove the screws using the appropriate screwdrivers, taking care to only partially remove the screws for the front of the robot. Be cautious when removing the top cover, as there is a cable connected to the LIDAR. Clean the dust from the motherboard and take a photo to remember the wire placement. Remove the metal flange of the wheel using a metal pointer, being gentle and not damaging the connector. Replace the wheel, reusing the PET bushings from the old wheel. Clean any rust stains on the connectors. Reassemble everything and enjoy the repaired vacuum cleaner wheel.
How do I replace vacuum cleaner wheels?
To replace vacuum cleaner wheels, follow these easy steps. Start by switching off the appliance and disconnecting it from the mains for safety. Use a flathead screwdriver or a blunt butter knife to remove the wheel cap, then unscrew the hub and remove it. Place the new wheel and secure it with the screw, then attach the hub. Repeat the process for the other wheel. Take note that while this guide is generally applicable, some models may have slight variations in the procedure. It is also important to maintain your vacuum cleaner wheels regularly to prevent common problems such as wear and tear around the axle or complete breakage.
How do I troubleshoot vacuum cleaner wheel issues?
If you are experiencing issues with your vacuum cleaner wheel, here are some troubleshooting tips. If the wheel is not spinning, check for any debris or obstructions that may be causing the blockage. Clean the wheel thoroughly and ensure it is properly aligned. If the wheel is stuck, try applying lubricant or gently tapping it to dislodge any debris. If the wheel keeps falling off, check for any loose or missing parts and tighten them accordingly. If these troubleshooting steps do not resolve the issue, it may be necessary to seek professional repair or replacement.


Leave a Reply