Assembling a Deerma vacuum cleaner is a simple process that can be completed in just a few easy steps. Whether you’re a first-time user or you’ve had experience with other vacuum cleaners, you’ll find that assembling a Deerma vacuum cleaner is quick and hassle-free.
Are you ready to get your Deerma vacuum cleaner up and running? In this step-by-step guide, I’ll walk you through the entire assembly process, ensuring that you have all the information you need to successfully put your vacuum cleaner together.
Key Takeaways:
- The assembly process for a Deerma vacuum cleaner is simple and straightforward.
- Ensure you have all the necessary parts before starting the assembly.
- Follow the step-by-step instructions provided to assemble your vacuum cleaner correctly.
- Regular cleaning and maintenance will help ensure optimal performance and longevity.
- Enjoy a cleaner home with your newly assembled Deerma vacuum cleaner!
Gather the Necessary Parts for Assembly
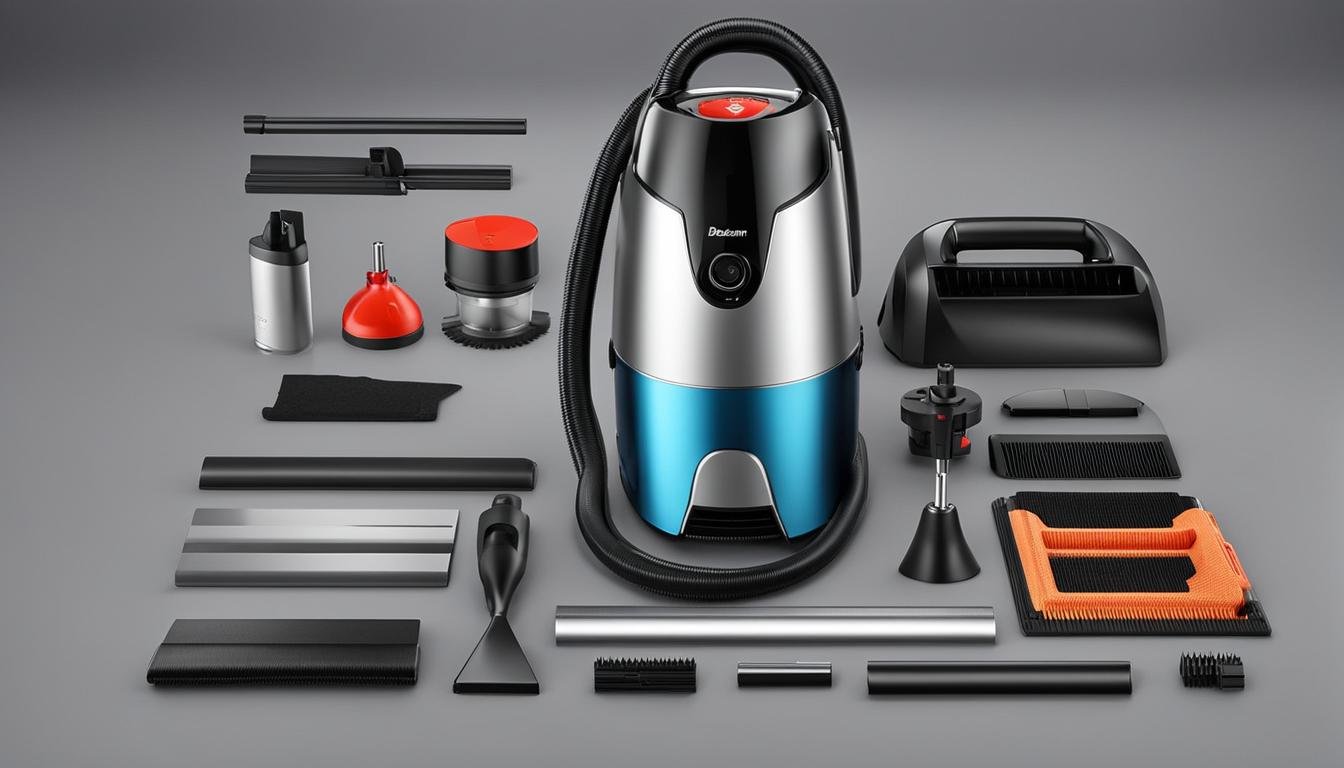
Before assembling your Deerma vacuum cleaner, make sure you have all the necessary parts. These include the main body, power cord, HEPA filter, foam filter, dust collection container, power cord hook, connecting tube assembly, and floor brush. Double-check that all the components are included in the packaging before moving on to the assembly process.
To help you ensure you have everything you need, here’s a handy checklist:
Parts Checklist:
| Main Body | Power Cord | HEPA Filter |
|---|---|---|
| Foam Filter | Dust Collection Container | Power Cord Hook |
| Connecting Tube Assembly | Floor Brush |
Note: The image below shows the assembled Deerma vacuum cleaner for reference:
Step-by-Step Assembly Instructions
Now that you have all the parts ready, follow these step-by-step instructions to assemble your Deerma vacuum cleaner:
-
Start by locating the main body of the vacuum cleaner. Place it on a flat surface.
-
Take the power cord and insert one end into the designated port on the main body. Ensure it is securely connected.
-
Next, locate the HEPA filter and insert it into the filter compartment. Make sure it fits snugly.
-
Now, take the foam filter and insert it into the filter compartment alongside the HEPA filter.
-
Locate the dust collection container and attach it to the main body of the vacuum cleaner. Ensure it clicks into place.
-
Take the power cord hook and insert it into the designated slot on the back of the vacuum cleaner. This will help keep the cord tidy.
-
Next, attach the connecting tube assembly to the vacuum cleaner. Align the grooves and twist it clockwise until it locks into position.
-
Finally, attach the floor brush to the end of the connecting tube assembly. Make sure it is securely fastened.
Once you have completed these steps, your Deerma vacuum cleaner is now fully assembled and ready for use. Refer to the user manual for further instructions on operating and maintaining your vacuum cleaner.
Why Assembly Matters
“Proper assembly of your Deerma vacuum cleaner ensures optimal performance and longevity. Following the step-by-step instructions provided will help you quickly and easily assemble your vacuum cleaner, allowing you to enjoy its benefits without any hassle.”
Cleaning and Maintenance Tips
Once you have assembled your Deerma vacuum cleaner, it’s important to keep it clean and well-maintained for optimal performance. Here are some expert tips for troubleshooting deerma vacuum cleaner assembly and ensuring it operates smoothly:
Clean the Filters Regularly
One of the key maintenance tasks for your Deerma vacuum cleaner is cleaning the filters. Over time, the filters can become clogged with dust and debris, which can reduce suction power. Follow the manufacturer’s instructions to remove and clean the filters regularly. This will help maintain the efficiency of your vacuum cleaner and ensure it continues to pick up dirt effectively.
Empty the Dust Collection Container
After each use, make sure to empty the dust collection container. Accumulated dirt and debris in the container can impede the vacuum cleaner’s performance. Remove the container, empty its contents, and clean it thoroughly. This will prevent any blockages and ensure optimal performance during future cleaning sessions.
Check for Blockages
If you notice a decrease in suction power or unusual noises coming from your Deerma vacuum cleaner, it may indicate a blockage. Check all the tubes, hoses, and attachments for any obstructions. Use a long, thin object like a broom handle to remove any blockages gently. Clearing these blockages will restore the vacuum cleaner’s suction power and improve its overall performance.
Inspect the Power Cord
Regularly inspect the power cord for any signs of damage or wear. A frayed or damaged power cord can be hazardous and may affect the vacuum cleaner’s functionality. If you notice any issues with the power cord, replace it immediately to avoid any safety hazards or performance issues.
Store the Vacuum Cleaner Properly
When not in use, it’s essential to store your Deerma vacuum cleaner properly. Make sure to wind the power cord carefully and store it in a safe place. Avoid storing the vacuum cleaner in damp or humid areas, as this can encourage the growth of mold or mildew. By storing your vacuum cleaner correctly, you can prolong its lifespan and ensure it remains in optimal working condition.

By following these expert tips for troubleshooting deerma vacuum cleaner assembly and maintaining your Deerma vacuum cleaner, you can enjoy efficient cleaning sessions and extend the lifespan of your appliance. Regular cleaning and maintenance will ensure that your Deerma vacuum cleaner continues to perform at its best, keeping your home clean and dust-free.
Conclusion
Assembling your Deerma vacuum cleaner is a breeze when you follow the step-by-step instructions in this guide. By gathering all the necessary parts and carefully following each assembly step, you’ll have your Deerma vacuum cleaner ready for use in no time.
Remember, regular cleaning and maintenance are crucial for keeping your vacuum cleaner in optimal condition. Ensure the longevity and performance of your Deerma vacuum cleaner by dedicating some time to cleaning the filters, emptying the dust collection container, and inspecting the power cord for any damage.
With your Deerma vacuum cleaner assembled and well-maintained, you can confidently tackle any cleaning task. Whether it’s carpets, hardwood floors, or upholstery, your Deerma vacuum cleaner will deliver efficient and powerful cleaning performance every time.
FAQ
What are the necessary parts for assembling a Deerma vacuum cleaner?
The necessary parts for assembling a Deerma vacuum cleaner include the main body, power cord, HEPA filter, foam filter, dust collection container, power cord hook, connecting tube assembly, and floor brush.
How do I assemble a Deerma vacuum cleaner?
To assemble a Deerma vacuum cleaner, follow these step-by-step instructions:
1. Connect the power cord to the main body.
2. Attach the HEPA filter and foam filter to their designated slots.
3. Place the dust collection container securely onto the main body.
4. Connect the connecting tube assembly to the dust collection container.
5. Attach the floor brush to the connecting tube assembly.
6. Securely hook the power cord using the power cord hook.
How do I clean and maintain my Deerma vacuum cleaner?
To clean and maintain your Deerma vacuum cleaner:
1. Regularly empty the dust collection container after each use.
2. Clean the filters by gently removing and tapping them to remove any accumulated dust.
3. Wash the filters with water and let them dry completely before reinstalling.
4. Check and remove any clogs or blockages in the connecting tube or floor brush.
5. Wipe the exterior surfaces of the vacuum cleaner with a clean, damp cloth.
6. Store the vacuum cleaner in a clean and dry area when not in use.


Leave a Reply